
How to Create a Liquidity Pool on Robinhood Chain (No Code, Uniswap V3)
You launched your token, it already shows up in your wallet, and still nobody can buy it. Why? Because a token without a pool has no market and no price. The fix is to create a liquidity pool on Robinhood Chain, and this guide walks you through it without writing a single line of code. In just a few minutes you’ll spin up a Uniswap V3 pool with the Smithii Create Liquidity Pool tool, for a flat fee of 0.01 ETH, and turn your token into something people can actually trade.
Robinhood Chain went live on July 1, 2026 as an Arbitrum Orbit L2 that settles on Ethereum. It’s 100% EVM-compatible, its gas token is ETH, and it ships with Uniswap and a Chainlink oracle integrated from day one. All of that makes it a clean, fast environment for a DEX pool. You can read the network fundamentals in what is Robinhood Chain and check on-chain data on the official Blockscout explorer.
What is a liquidity pool?
A liquidity pool (LP) is a smart contract that holds two assets side by side, for example your token and ETH, and lets anyone swap between them automatically. Instead of matching buyers and sellers like a traditional order book, the pool uses an automated market maker (AMM) formula to price trades based on the ratio of the two assets inside it. When someone buys your token, they add ETH to the pool and take out your token; the price moves along a curve as the balance shifts.
The people who deposit both assets are called liquidity providers, and anyone can become one in a pool that already exists. On Uniswap V3, providers can concentrate their capital inside a specific price range, instead of spreading it across the whole curve from zero to infinity. That means more liquidity depth right where trading actually happens, and less slippage for your buyers with the same amount of capital.
Why your token needs a pool to be tradeable
Creating an ERC-20 token mints the full supply to your wallet, but that’s all it does. Until a pool exists, your token has three problems:
- No price: a token without a pool has no market price. Wallets, explorers, and chart platforms have nothing to display.
- No trading: nobody can buy it or sell it. There’s simply nowhere for a swap to execute.
- No credibility: holders and listing platforms like CoinGecko and CoinMarketCap expect real on-chain liquidity before taking a token seriously.
The pool solves all three at once. The moment it’s live, your token has a price, anyone can trade it, and your project sends a real credibility signal. That’s why spinning up a pool is the natural next step right after creating a token on Robinhood Chain.
How much does it cost to create a liquidity pool on Robinhood Chain?
Doing it by hand means writing the Uniswap V3 factory pool-creation calls yourself, or paying a dev to do it for you. Hiring someone for that kind of on-chain work is expensive, usually $200 USD or more, and one misconfigured parameter can leave you with a broken pool. That’s exactly why the Smithii suite exists: to open crypto to anyone so you can create a Uniswap V3 pool without writing a single line of code.
The Smithii Create Liquidity Pool tool charges a flat fee of 0.01 ETH (a few dollars), plus a small network gas cost and whatever liquidity you decide to deposit. No subscriptions, no cut of your supply, no hidden fees. Since the gas token on Robinhood Chain is ETH, make sure your wallet holds some ETH on the network to cover the fee, the gas, and the ETH side of your pool.
How to create a liquidity pool on Robinhood Chain, step by step
The dApp we’re going to use is the Smithii Create Liquidity Pool tool. It works as a no-code Uniswap V3 pool generator and deploys directly on Robinhood Chain. Here’s the full flow:
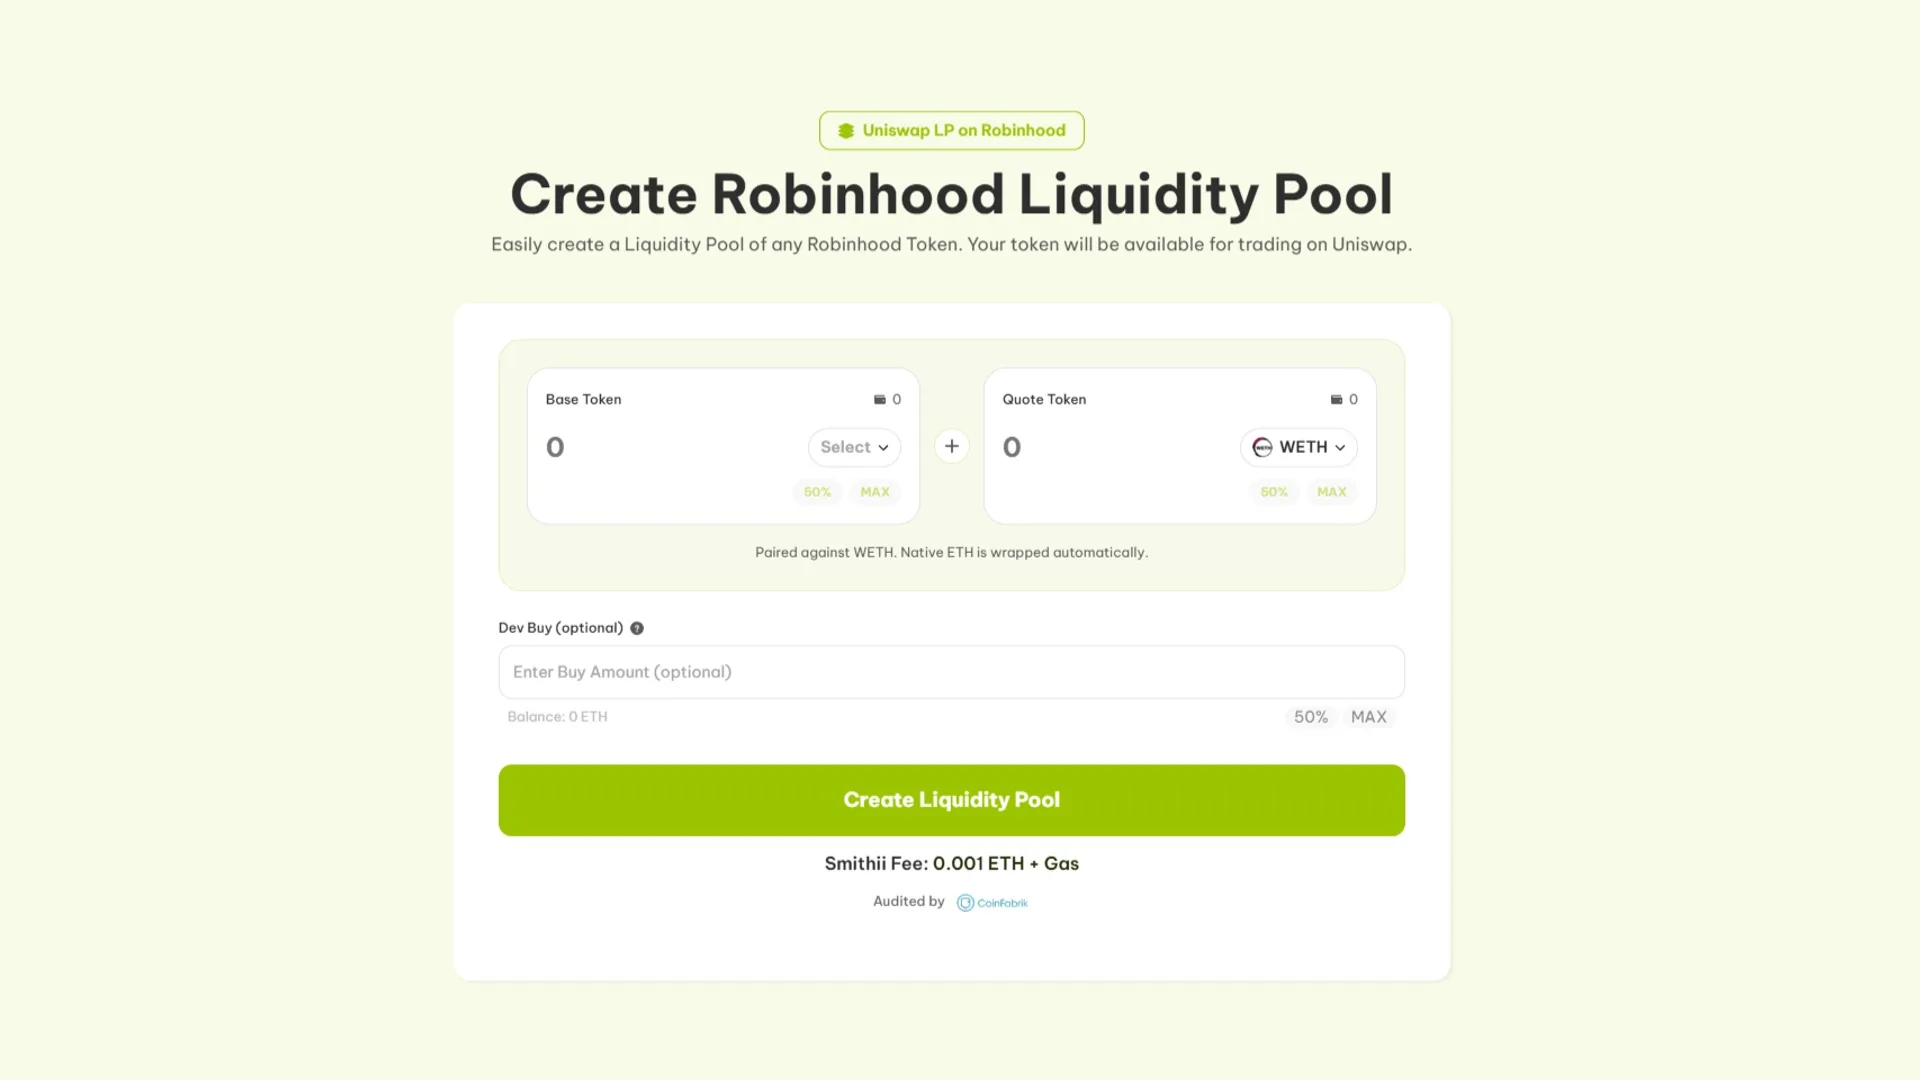
- Open the tool: head to the Create Liquidity Pool tool and make sure the network selector shows Robinhood Chain.
- Connect your wallet: hit Connect and approve with MetaMask, Rabby, or any EVM wallet. If Robinhood Chain isn’t added yet, add it first (RPC
https://rpc.mainnet.chain.robinhood.com, chainId 4663). - Pick your token: paste the contract address of the token you created. The tool automatically reads its name, symbol, and decimals.
- Choose the paired asset: select what your token trades against, usually ETH or a stablecoin like USDG or USDe. That’s the other side of your Uniswap V3 pool.
- Set the amounts and starting price: enter how many token and how much of the paired asset you’re going to deposit. That ratio sets the launch price of your token, so pick it carefully.
- Approve and confirm: approve the token spend and confirm the 0.01 ETH pool creation transaction in your wallet. Wait a few seconds for the block to confirm.
- Verify the pool: your Uniswap V3 pool is now live. Check it on the Blockscout explorer and your token is officially tradeable.
That’s it. In about two minutes you’ve spun up a real Uniswap V3 pool on Robinhood Chain, with no coding required, and your token now has a price anyone can trade against.
Why Uniswap V3 pools fit the Robinhood Chain ecosystem
Uniswap V3 is the concentrated liquidity version of the protocol. Unlike classic constant-product designs, V3 lets you place your capital exactly in the price range where trading actually happens, so the same deposit produces deeper liquidity and tighter spreads. For a new token, that matters: your first buyers get a fair price instead of massive slippage on the first swaps. You can check the technical details in the Uniswap V3 documentation.
It also fits perfectly with how the rest of Robinhood Chain works. The main launchpads on the network, including Noxa, Flap and Trench, graduate their tokens directly to Uniswap V3 pools. When you create a V3 pool with Smithii, your token trades in the same type of pool traders are already used to on the chain. That consistency helps routing, aggregators and every charting tool that indexes V3 pools.
Launching a memecoin instead of a utility token? Read how to create a meme coin on Robinhood Chain first, then come back here to seed its pool.
What you should know before depositing into your pool
A pool is only as good as the numbers you initialize it with. Before you confirm, think it through:
- Initial price and ratio: the ratio of token to the pair asset sets your launch price. More ETH against fewer tokens means a higher opening price. Decide the market cap you want to open at and work backwards from there.
- How much liquidity to add: pools with thin liquidity produce heavy slippage and scare buyers off. More liquidity keeps the chart stable. If you’re not sure how much to put in, our guide on launching your token covers supply and distribution planning, which directly feeds into this.
- Pair asset: ETH is the deepest and most recognized pair on Robinhood Chain. A stablecoin like USDG or USDe gives you a more stable quote price if you prefer that.
- Gas and fee in ETH: everything on Robinhood Chain is paid in ETH, so make sure you hold enough on the network to cover the 0.01 ETH tool fee plus gas.
Bottom line: deposit the liquidity you’re actually willing to leave in the pool, at an opening price that reflects a realistic valuation. You can always add more later, but the first ratio you set is the price your market opens at.
Once the pool is live and trading, the next step is keeping it alive. Smithii has a Robinhood Chain Volume Bot that runs automated buy and sell cycles so your chart doesn’t die and your token keeps showing up in trending feeds.
FAQ
How much does it cost to create a liquidity pool on Robinhood Chain?
The Smithii Create Liquidity Pool tool charges a flat 0.01 ETH fee plus a small network gas fee, on top of whatever liquidity you choose to deposit. Since ETH is Robinhood Chain’s native token gas asset, you pay everything in ETH.
What kind of pool does the tool create?
It creates a Uniswap V3 pool on Robinhood Chain. V3 uses concentrated liquidity, so your deposit produces deeper liquidity and less slippage in the price range where trading actually happens.
Do I need to know how to code?
No. The tool creates the Uniswap V3 pool for you. You select your token, pick the pair asset, set the amounts and confirm a single transaction. Zero coding required.
What should I pair my token with?
ETH is the deepest and most recognizable pair on Robinhood Chain. If you prefer a more stable quote price, you can pair with a stablecoin like USDG or USDe. Either way, you deposit both sides when you create the pool.
How do I set the initial price of my token?
The opening price comes from the ratio you deposit. More pair asset against fewer tokens opens at a higher price. Decide the market cap you want to launch at and size the amounts to match that valuation.
Where can I see my pool once it’s created?
Your pool shows up on the Robinhood Chain block explorer at robinhoodchain.blockscout.com, and your token is available for trading through Uniswap on the network. Keep in mind Robinhood Chain uses Blockscout, not Etherscan.
Wrapping up
Now you know exactly how to create liquidity pool on Robinhood Chain: connect a wallet, select your token, pick the pair asset, set the amounts and confirm a single 0.01 ETH transaction to initialize a Uniswap V3 pool. No developers, no manual factory calls, no wasted week. Your token goes from a balance in your wallet to a real, tradable market with a live price.
The Smithii suite is the all-in-one solution for web3 projects, and Robinhood Chain is a fast, fully EVM-compatible new network to launch and operate on. Spin up the pool, keep it active and your token is market-ready.
Subscribe to our newsletter to be the first to hear about every new Robinhood Chain tool and every token opportunity.
The full Robinhood Chain toolkit
Everything you need to launch and grow a project on Robinhood Chain, no code required, powered by Smithii:
- Start here: What is Robinhood Chain · best wallets
- Create and launch: create a token · create a meme coin · create a liquidity pool
- Distribute: airdrop ERC-20 tokens · airdrop & testnet guide
- Manage and verify: add logo and socials · verify your contract · pull the holders list
- Grow: volume bot · market maker
- Flap volume bot · Trench volume bot · Bankr volume bot

CEO & Co-Founder at Smithii. Building on Solana since 2021 and sharing playbooks from the trenches. Also founder of Lince after years investing in DeFi.