How to Add a Logo to a Robinhood Chain token (Logo, Social Links, and Metadata)
If you’ve already deployed your ERC-20 on Robinhood Chain (chainId 4663), the next step is to add a logo to your Robinhood Chain token along with social links and metadata. That’s what turns a raw contract address into a recognizable, credible asset: the kind that builds trust the moment it shows up in a wallet or a DEX like Uniswap.
Before you start, have the following ready:
- Access to the wallet you used to deploy the token on Robinhood Chain.
- The token contract address whose info you want to update.
- Your verified contract on the block explorer for Robinhood Chain, which is Blockscout at robinhoodchain.blockscout.com. Note: Robinhood Chain doesn’t use Etherscan, so don’t look for it there.
- Your logo file, ideally a square PNG (32×32 or larger) with a transparent background.
- The metadata you want to publish: website, X (Twitter), Telegram, Discord, and a short project description.
Don’t have your Robinhood Chain token yet and thinking about launching one? Check out this guide on how to create one the easy way.
Why Add a Logo to Your Robinhood Chain token?
The logo isn’t decoration. It shows up the moment someone imports your token into their wallet or interacts with a liquidity pool on a decentralized exchange. Robinhood Chain launches with Uniswap v2, v3, v4, and UniswapX active from day one, plus a Chainlink oracle, so your token will be traded and analyzed right out of the gate. A token with a clean logo and verified socials reads like a real project. One with a blank space reads like a rug waiting to happen.
Metadata does the same job on the due-diligence side. A website, X, Telegram, and a description give buyers something to check before they commit. That’s the transparency that turns a curious wallet into a holder. The logo and links you submit here are what interfaces read from the on-chain metadata of your token, the same data a wallet pulls when it renders your token ERC-20.
Step 1: Verify Your Contract on Blockscout
Before Blockscout will show a logo or accept the token info, your contract needs to be verified. Head to robinhoodchain.blockscout.com and paste your token contract address in the search bar to open its page.
Open the ‘Contract’ tab and click ‘Verify & Publish’. Blockscout will ask for the compiler version, license, and source code (or standard JSON input). Match what you used when deploying and submit. Once it goes through, a green checkmark appears next to the contract and the read/write methods show up.
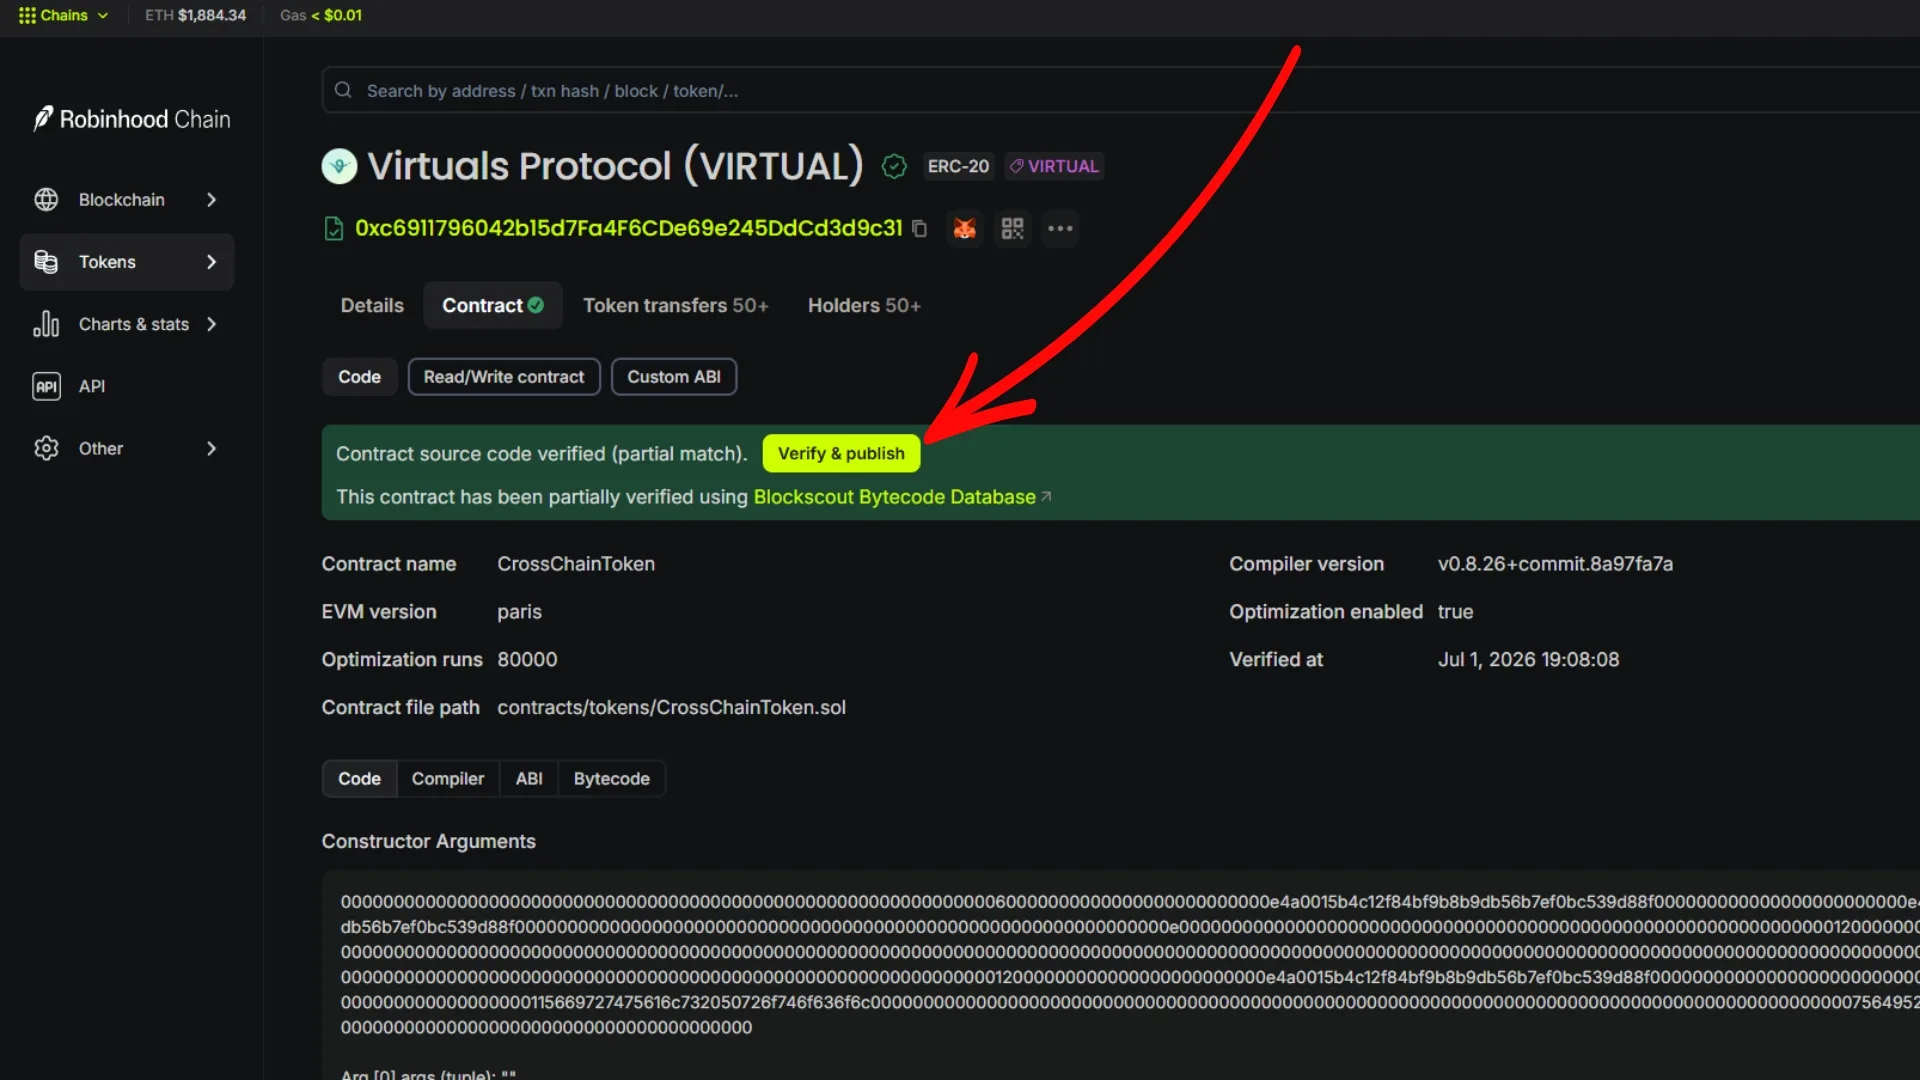
If verification trips you up, we break the whole process down in a separate guide: how to verify an ERC-20 contract on Robinhood Chain. Don’t skip this step. Everything below depends on it.
Step 2: Submit a token Info Request on Blockscout
Unlike Etherscan, Blockscout doesn’t require you to sign an on-chain ownership message and wait for manual review on every field. On your verified token page, open the token details and look for the option to submit or request an update for token info. That’s where you upload the logo and metadata.
- Open the token info form: from your verified token page on Blockscout, select the action to request token info for your contract address.
- Upload your logo: use a square PNG, 32×32 or larger, with a transparent background so it renders cleanly in wallets and on Uniswap.
- Add your socials and description: website, X (Twitter), Telegram, and Discord, plus a short, factual project description.
- No hype: phrases like ‘the most-used token’ or promises of returns will get your request rejected. Keep it clear and verifiable.
- Submit and wait for review: the Blockscout team will validate your request. Watch your inbox and reply to the confirmation email to keep things moving.
Once approved, your logo and links show up in the explorer and propagate to wallets and tools that read Robinhood Chain metadata. The whole process is free. You can only add a logo to a Robinhood Chain token if the contract is verified, so if it isn’t, go back to Step 1.
Skip the Verification Hassle with Smithii
Hiring a dev to code and deploy a smart contract isn’t cheap. Usually 200 USD or more, and you’re still left handling verification yourself. That’s why Smithii’s online tools open the crypto ecosystem to anyone, letting you create your own token without writing a single line of code, for 0.03 ETH on Robinhood Chain, where gas is paid in ETH.
The dApp we’re using is the Robinhood Chain Token Creator. It works as a no-code ERC-20 generator, and the tokens you create with it come out verified by default from the moment of creation, so you skip Step 1 entirely and go straight to setting up the logo and socials. The whole thing takes about a minute and never asks you to touch a single line of code.
Once your token is live and branded, you can also distribute it to your community using the Robinhood Chain Multisender for just 0.00015 ETH.
FAQ
Do I need to verify the contract before adding a logo to a Robinhood Chain token?
Yes. Blockscout only accepts the logo and token info request if the contract is verified. Verify first at robinhoodchain.blockscout.com, then submit the request. Tokens created with the Token Creator from Smithii come verified by default.
What explorer does Robinhood Chain use?
Robinhood Chain uses Blockscout at robinhoodchain.blockscout.com, not Etherscan. Etherscan doesn’t support chainId 4663, so all logo uploads, verification, and metadata updates happen on Blockscout.
What logo format should I use?
A square PNG at least 32×32 pixels with a transparent background works best. It renders cleanly in wallets and Uniswap pools, with no cropping or a color box behind it.
How much does it cost to add a logo and socials?
Submitting the token info request on Blockscout is free. You only pay gas in ETH for the prior verification transaction. Creating a pre-verified token from scratch with Smithii costs 0.01 ETH (around 35 USD).
Can I update the metadata later?
Yes. You can submit a new token info request on Blockscout to update your website, socials, or description at any time. Each update goes through the same review, so keep the text factual to avoid rejections.
Conclusion: Give Your Robinhood Chain token an Identity
Adding a logo is key to your token’s credibility. It shows up instantly when someone imports it into their wallet or interacts with a liquidity pool on Uniswap. A proper image gives the project an identity and boosts brand recognition, while your socials give potential investors a way to research you and one more reason to buy.
To wrap up: verify on Blockscout, submit the token info request with a clean PNG and factual metadata, and you’re done. New to the network? Start with what Robinhood Chain is. Hope this helped. Subscribe to our newsletter and stay on top of the best crypto content.
The Complete Robinhood Chain Toolkit
Everything you need to launch and grow a project on Robinhood Chain, no code required, with Smithii:
- Get started: What is Robinhood Chain · best wallets
- Create and launch: create a token · create a meme coin · create a liquidity pool
- Distribute: token airdrop · airdrop and testnet guide
- Manage and verify: add logo and socials · verify your contract · view holder list
- Grow: volume bot · market maker
- Flap volume bot · Trench volume bot · Bankr volume bot

CEO & Co-Founder at Smithii. Building on Solana since 2021 and sharing playbooks from the trenches. Also founder of Lince after years investing in DeFi.