
How to renounce ownership of a token on NEAR: boost how buyers see your token and open up more opportunities
Knowing how to renounce ownership of a token on NEAR is how you prove to buyers that nobody is going to mint more tokens, pause transfers, or raise their fees. Renouncing those permissions clears the main concern any holder has about a new token and is one of the first things security reviews check for.
In this guide I’ll walk you through what permissions the owner of a token holds on NEAR, how to renounce them with the Token Manager by Smithii, what you need to lock in beforehand because afterwards you won’t be able to, and what alternatives you have if you’d rather not give it all up. Let’s dive in.
What renouncing ownership on NEAR actually means
On Solana, a token has several separate authorities, like mint or freeze, and each one is revoked on its own. On NEAR, every token has a single figure, the owner, who can still mint more tokens, change the tax, and is the account authorized to call the smart contract’s admin methods.
That’s why here everything is handled with a single action: renouncing ownership. It’s all or nothing: once you do it, every owner permission the token had disappears at the same time.
If you’re coming from Solana and want to compare, check out how a token’s authorities are revoked individually on Solana.
The two layers of control over a token on NEAR
On NEAR it’s worth distinguishing two levels. The first is the access keys of the token’s account: anyone holding a full access key can swap out the contract’s code. Smithii tokens are created with no keys attached, so that risk is off the table from day one.
The second level is the owner permissions defined by the contract itself, and these are the ones you wipe out when you renounce ownership. These are the ones a token created with Smithii can hold on to, depending on which options were enabled at launch:
- Mint more supply, if the token is mintable.
- Pause and resume all transfers, if it’s pausable.
- Edit the blacklist and the accounts exempt from fees or anti-bot rules.
- Change the accounts that receive the tax and lower it or turn it off.
- Loosen the anti-whale limits and register new pools.
- Update the name, logo, and links of the token.
How to renounce ownership of a token on NEAR step by step
The Token Manager by Smithii for NEAR is a dashboard that lets you handle every owner action on your token without writing any code, from renouncing ownership to swapping the logo. It reads which options your token has and only shows the ones you can actually use. In the interface you’ll find sections for ownership, supply, security, tax, economy, and metadata:
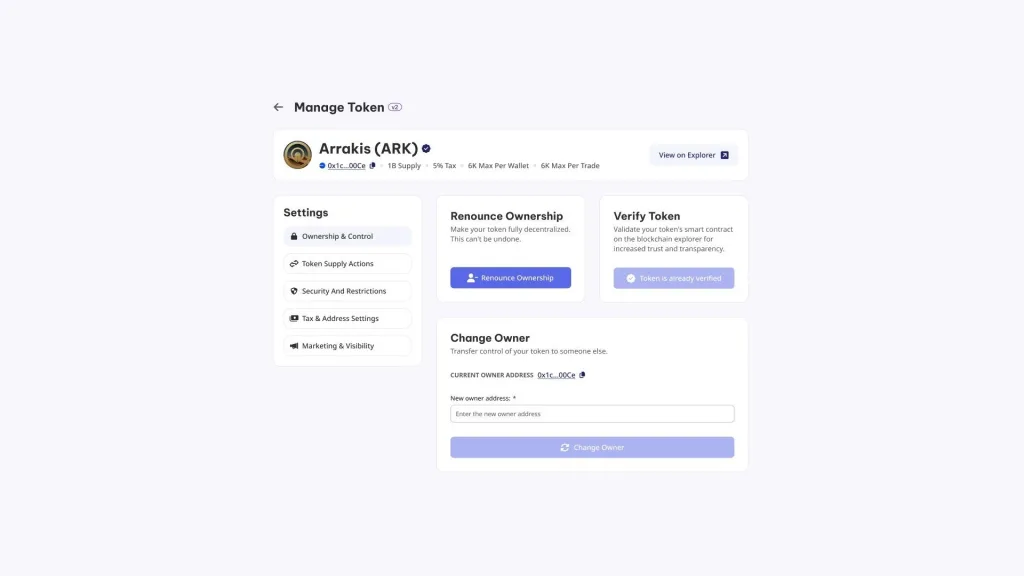
If your token is already configured the way you want to leave it forever and you’ve got 4.62 NEAR for the fee, here’s what to do:
- Connect the owner wallet: the one that created the token or the one ownership was transferred to.
- Select your token: pick it from the list or paste its account, for example pepe-1.smithii.near.
- Open the ownership section: that’s where the renounce and change owner options live.
- Hit Renounce Ownership: the panel reminds you the action can’t be undone.
- Approve the transaction: in a few seconds the token is left with no owner.
Once it’s confirmed, the token no longer has an owner and anyone can verify it on-chain. If the transaction fails before going through, the next attempt won’t charge you the fee again.
What to lock in before renouncing ownership
Renouncing is a one-way door, and with it goes any chance to fix things later. This is the order that keeps you out of trouble:
- Create the pool and add the initial liquidity: while you’re the owner, your wallet is exempt from token’s fees. Once you renounce, moving tokens to Rhea will pay the tax like any other account.
- Finish any large distributions: the airdrop or the team allocation also benefit from the exemption.
- Lock in the final metadata: name, logo, and links can only be changed by the owner. If your site or socials are going to change, update them beforehand.
- Double-check the blacklist and pauses: a token left paused or with blocked accounts after you renounce stays that way forever.
- Set the tax accounts in stone: decide where the fees go before you lose the ability to change it.
There’s one liquidity detail worth keeping in mind. Pulling liquidity out of Rhea always pays the token fees, because the DEX isn’t exempt, so the exemption only covers you when adding liquidity, not when removing it.
If you haven’t opened the market yet, here’s how to create a liquidity pool on NEAR before renouncing.
How a buyer verifies that you’ve renounced
Renouncing doesn’t do much if nobody knows about it. Once you’ve signed, share the NearBlocks transaction link with your community, since it’s the public proof that the token no longer has an owner.
Anyone who doesn’t trust a link can check it themselves with a security scan. A rug check from a token Smithii shows whether the account has full access keys, whether the code matches the audited version, and which owner options are still active, so your renouncement shows up without you having to explain anything.
This is how a buyer sees it: how to tell if a NEAR token is safe before buying it.
Transferring ownership instead of renouncing
Renouncing isn’t the only way to build trust. If the project is still going to need tweaks, you can transfer ownership to another account, for instance one managed by several team members, from the same section of the panel. It costs 4.62 NEAR, same as renouncing.
It’s a reasonable option when you still need to change the metadata or adjust the tax, and you want that decision not to depend on a single wallet. Explain to your community which account holds control and what it’s going to be used for, because an active owner always raises questions.
The rest of the settings in the NEAR Token Manager
As long as you don’t renounce, the panel lets you manage the token section by section. Only three actions carry a Smithii fee, and the rest only cost gas plus a small storage deposit that’s partly refunded.
| Action | What it does | Cost |
|---|---|---|
| Renounce ownership | Permanently removes every owner permission | 4.62 NEAR |
| Change owner | Transfers control to another account | 4.62 NEAR |
| Mint supply | Creates new tokens, if the token is mintable | 4.62 NEAR |
| Pause, blacklist, and exemptions | Emergency brakes and exempt accounts | Gas only |
| Tax and anti-whale | Lower the tax, swap its accounts, loosen limits | Gas only |
| Metadata | Name, logo and links of the token | Gas only |
There are two things no panel can touch: the symbol and the decimals, which get locked in when the token is created. If you’re not happy with them, the only way out is to spin up a new token.
FAQ
What happens when I renounce ownership of a token on NEAR?
No one can call the owner methods on the token ever again: no more minting supply, no pausing, no editing the blacklist, no changing the tax. The fee exemptions your wallet had as owner also go away.
Can renouncing ownership be undone?
No. Once you renounce, the token has no owner anymore, and nobody, Smithii included, can recover those permissions. That’s why the panel warns you before you sign.
How much does it cost to renounce ownership of a token on NEAR?
Renouncing costs 4.62 NEAR plus gas, same as minting supply or changing the owner. Every other tweak in the Token Manager only costs gas plus a small storage deposit that gets partly refunded.
Which tokens can I manage with the NEAR Token Manager?
NEP-141 tokens created with Smithii, whose accounts look like pepe-1.smithii.near, as long as your wallet is the owner. The panel reads the owner straight from the token and blocks anything you can’t sign.
Can I raise the tax or tighten the anti-whale before renouncing?
The tax can be changed, turned off and turned back on, but never above the total it was created with. Anti-whale limits can only be loosened, and the panel rejects a stricter value before you even sign.
Wrap-up
Once you know how to renounce ownership of a token on NEAR, you can close every permission on your token with a single signature and prove it on-chain. With an account that has no keys and no owner, your token stays exactly how you left it, with no one able to change its code or its rules.
The trick is the order: liquidity, distributions and metadata first, renounce last. If you’re not sure, hand ownership over to a shared account while you finish tuning the project.

Content creator and SEO contributor at Smithii. Systems Engineering student and crypto-tech enthusiast.