






How to create a Token on Arbitrum: Ethereum security, L2 costs
The reason to create a token on Arbitrum instead of anywhere else is a tradeoff nobody has to make anymore: your token settles back to Ethereum, but you pay Layer 2 prices to use it. No developer, no compiler, no Solidity.
Deploying is the fast part. The decisions that stick with you are the permissions, because a contract that can still mint or pause tells a buyer something very different than one that can’t, and Arbiscan shows both either way.
What follows covers the deployment, every option in the tool, what it costs, and how to bring your token to a market.
Why projects launch on Arbitrum
Cheap transactions aren’t the differentiator. Most Ethereum rollups are cheap. The case for Arbitrum is that low cost comes bundled with the deepest DeFi ecosystem of any L2, which matters the moment your token needs a pool, a lending market, or an analytics tool that already exists.
It settles on Ethereum, so the security model is inherited instead of invented. For a project planning to plug into existing infra from day one, that combination is worth more than shaving off another fraction of gas.
It isn’t automatically the right choice. A consumer product with a Coinbase-style audience may do better on Base, and anything whose pitch is mainnet settlement belongs on Ethereum itself. The ERC-20 you deploy is identical in all three cases; only the neighborhood changes.
What you need before you start
- An EVM wallet pointed at Arbitrum One: MetaMask, Rabby, or WalletConnect.
- ETH on Arbitrum for the fee and gas.
- Name, ticker, and supply decided. Everything else is picked inside the tool.
How to create a token on Arbitrum step by step
Everything happens in Smithii’s Arbitrum Creator on Token.
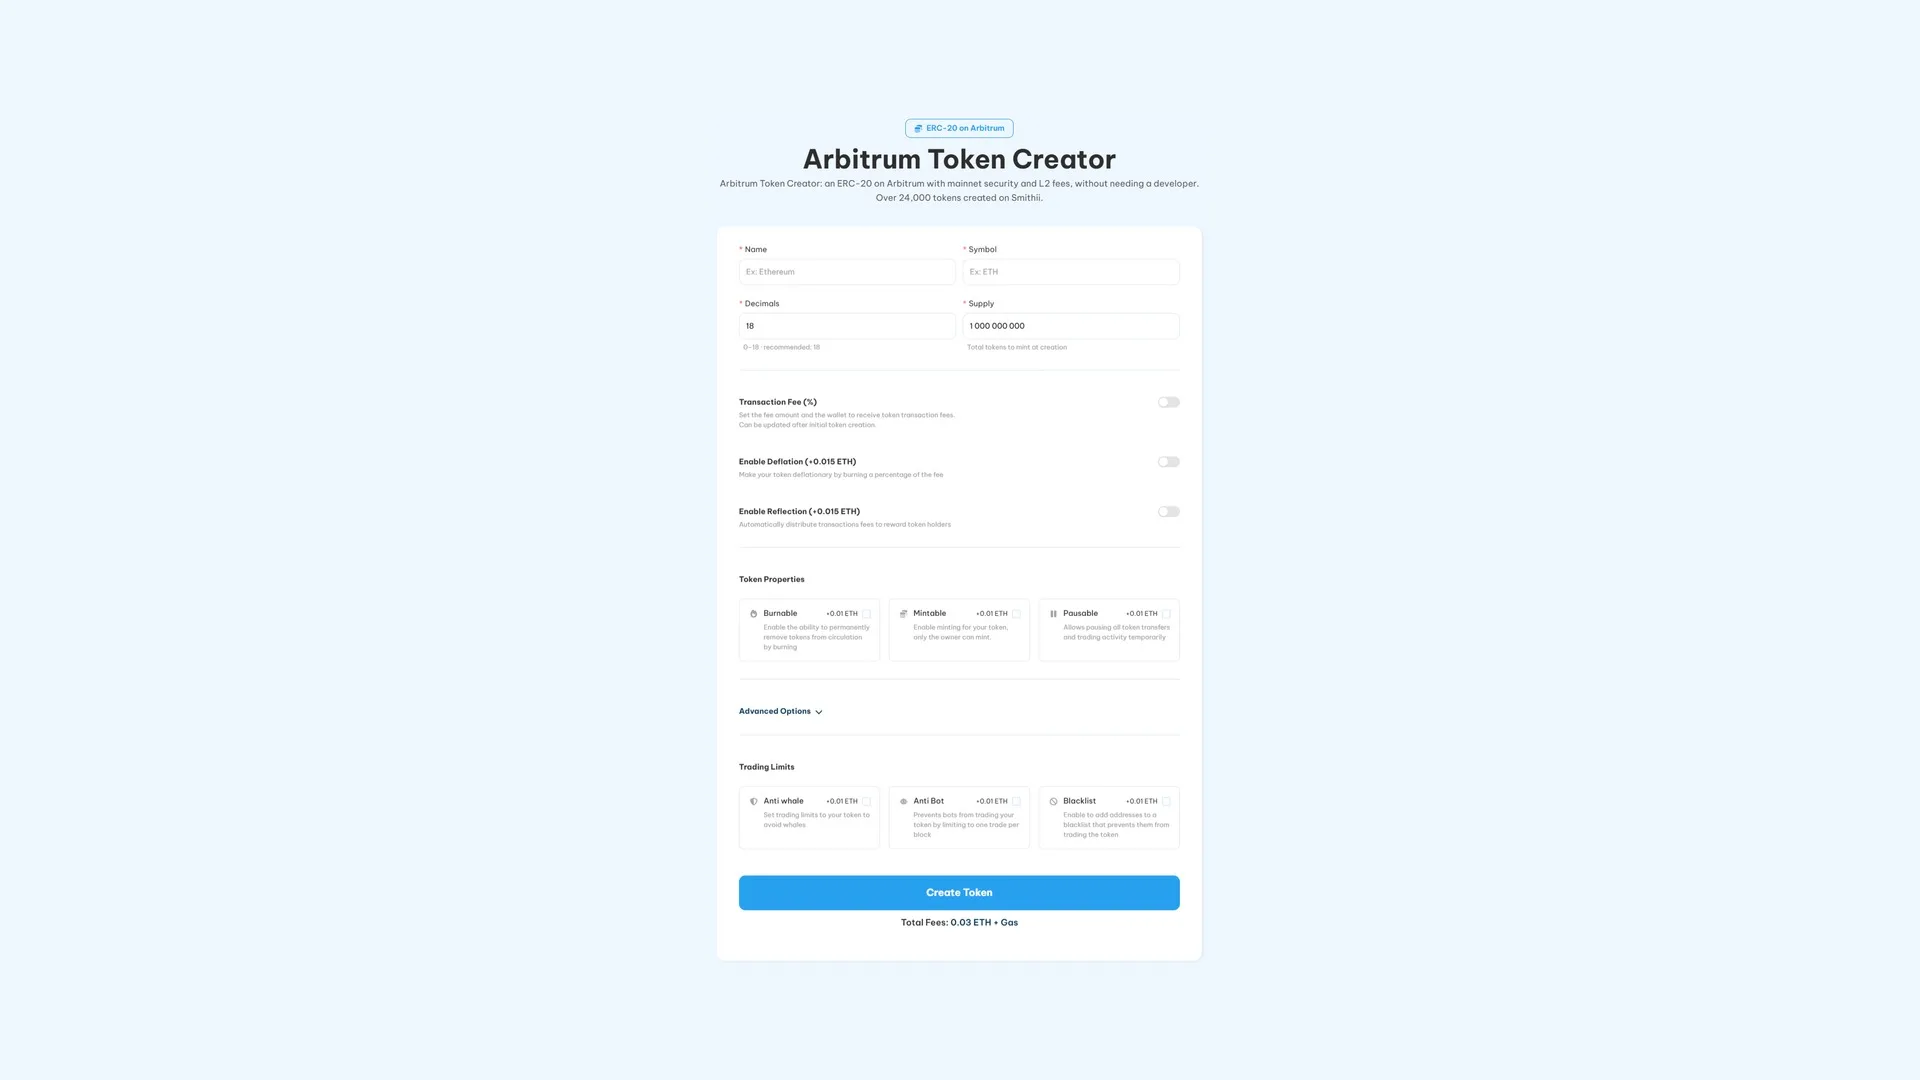
- Connect your wallet. Whatever signs is what owns the contract, so use the wallet you actually plan to keep.
- Enter the name and symbol. Keep the ticker short and not already used by something bigger.
- Set decimals and supply. Eighteen decimals is the standard, and the supply is minted in one go into your wallet.
- Pick your options from the sections below.
- Click Create Token and approve. Read the total the tool shows you first.
Once it confirms, the supply is yours and the source code is verified on Arbiscan without you having to do anything else. Need the address later? our guide to finding a token’s contract address covers it.
The permissions you keep or give up
They’re written into the contract at deployment, and anyone can read which ones are active. Treat it as part of your launch messaging, not something for people to dig up.
- Mintable (0.01 ETH). More supply can be issued later, owner only. Legit for phased issuance, lethal for a hard cap narrative.
- Burnable (0.01 ETH). Supply can be destroyed on demand, which is exactly what announced burns and buybacks need.
- Pausable (0.01 ETH). Transfers and trading halt when an authorized wallet calls it. An emergency lever, and a heavy one.
Fees and holder mechanics
- Transaction Fee (free). A percentage of every buy and sell, split across up to 10 wallets. The percentage stays adjustable after launch and turning it on costs nothing extra.
- Deflation (0.015 ETH). Routes part of that fee into a burn, so supply drops as volume grows.
- Reflection (0.015 ETH). Routes it to holders automatically, above a minimum balance you set.
Launch protections
The first block after liquidity opens is where launches are won or lost. Bots are lying in wait for exactly that moment.
- Anti-Bot (0.01 ETH). One trade per block, which shuts down sniping at the root.
- Anti-Whale (0.01 ETH). Trade size, frequency, and total holding caps per wallet, active during the time window you pick.
- Blacklist (0.01 ETH). Flagged addresses lose the ability to trade the moment you tag them.
Going to market
- Multi-Wallet Distribution (0.01 ETH). Up to 10 wallets get their allocation during creation, so the tokenomics exist before the token itself does.
- DEXTools socials and banner (0.15 ETH). Branding and channels get pushed to DEXTools from the tool, faster and cheaper than filing it yourself.
- Create a liquidity pool (0.01 ETH). Open the pool against ETH in the same run, with the starting price on screen before you confirm.
The ETH you pair into a pool is deposited, not spent. It flows back to you as buyers arrive.
What it costs
Deployment runs 0.03 ETH plus Arbitrum gas, and that gas is L2, not mainnet. Options are charged separately, so a token with nothing toggled on pays only the base fee. The tool calculates the exact total for your setup before you sign.
Making it tradeable
A deployed contract has no price. Until liquidity exists, your token just moves between wallets and nothing else.
Uniswap is the standard venue for ERC-20 liquidity on Arbitrum. If you skipped the pool option, our guide to creating a liquidity pool on Uniswap walks through the manual route, and it’s worth reading how much liquidity to add before landing on a number. To unwind it later, check out removing liquidity on Arbitrum.
After the launch
- Distribute at scale instead of going one by one: how to run an airdrop for a token on Arbitrum.
- Keep the pair moving once you have holders, with the Arbitrum volume bot.
- Watch your distribution with a holder snapshot on Arbitrum.
- Request listings, both free: CoinMarketCap and CoinGecko.
Building a meme coin instead of a utility token? How to create a meme coin on Arbitrum covers the version of this with different priorities.
Who controls the contract
The wallet you connect, from the very first block. The tool runs the deployment, but ownership never passes through it, and at no point does the process ask you for a seed phrase or a private key.
The contracts behind the tool have been reviewed by external security firms. That doesn’t settle the question of which options you turned on, though. A verified contract with mint authority active is still a contract that can print more supply.
FAQ
How much does it cost to create a token on Arbitrum?
0.03 ETH plus Arbitrum gas. Optional features start at 0.01 ETH each, and the tool calculates the total for your setup before you approve anything.
Do I need a dev?
No. Nothing to compile or deploy by hand. You fill out the tool, approve a transaction, and an audited ERC-20 ships under your wallet.
Is a token on Arbitrum the same as one on Ethereum?
It’s the same ERC-20 standard, and it settles on Ethereum. What changes is the cost of every interaction, which is why most projects run here instead of on mainnet.
Which options are permanent?
Almost all of them. Burnable, mintable, pausable, trading limits, and the blacklist all have to be turned on at creation. Only the transaction fee percentage stays adjustable afterward.
Is the contract verified automatically?
Yes. The source code gets published on Arbiscan as part of the deployment, so holders can read it without you having to file anything.
Can it be traded right away?
Only once a pool exists. Until then, the token transfers and supports airdrops just fine, but it has no market and no price.
Wrapping up
Launching an ERC-20 on Arbitrum is a configuration job when the project doesn’t need custom code. The chain gives you Ethereum settlement with L2 operating costs, and the tool handles the deployment plus Arbiscan verification, while the contract stays yours.
What’s left is the part no tool covers: sensible liquidity, permissions you’re willing to defend in public, and a real reason for anyone to hold this. Get the permanent decisions right before you sign, because the rest can be fixed and those can’t.
If you’d rather see the whole process laid out, the definitive guide for devs on Arbitrum walks through every step of the project from start to finish, with links to the detailed guide for each one.

Crypto writer focused on the Web3 space. Former contributor to the Smithii editorial team.