









How to create a ERC20 Token on Ethereum without writing Solidity
You’ve got the name, the ticker, and a rough idea of the supply. What you want is your token live on Ethereum today, not after a weekend of reading.
The deploy is the easy part. What catches people off guard is the first ten minutes after opening liquidity: bots grabbing the first block, a wallet walking off with a third of the supply, and you unable to do anything because the contract shipped bare. A launch isn’t won at deploy time, it’s won in the settings you pick before signing.
So here’s how to create a token on Ethereum without writing a line of code, step by step, plus what’s worth enabling before you confirm.
If you’d rather watch a video walkthrough, here’s one that covers everything you need to do:
What is an ERC-20 token on Ethereum?
ERC-20 is the standard that defines how a fungible token behaves on Ethereum: how it moves, how balances are read, and how other contracts talk to it. It’s the most used token standard in crypto, and that’s exactly why it’s the safe default.
Because the standard is shared, the token you deploy today works with any EVM wallet, any explorer, and any DEX without extra work. Utility token, governance token, or memecoin, the contract is the same and only your config changes. If you’re weighing chains, our ERC-20 vs BEP-20 comparison goes through the pros and cons.
What you need before launching a token on Ethereum
- An EVM wallet: MetaMask, Rabby, or any other with WalletConnect.
- ETH in that wallet to cover the tool fee and gas.
- Name, ticker, and total supply already locked in. Everything else you can rethink later.
How to create a token on Ethereum step by step
The tool is the Ethereum Token Creator by Smithii. Six steps and you’re done:
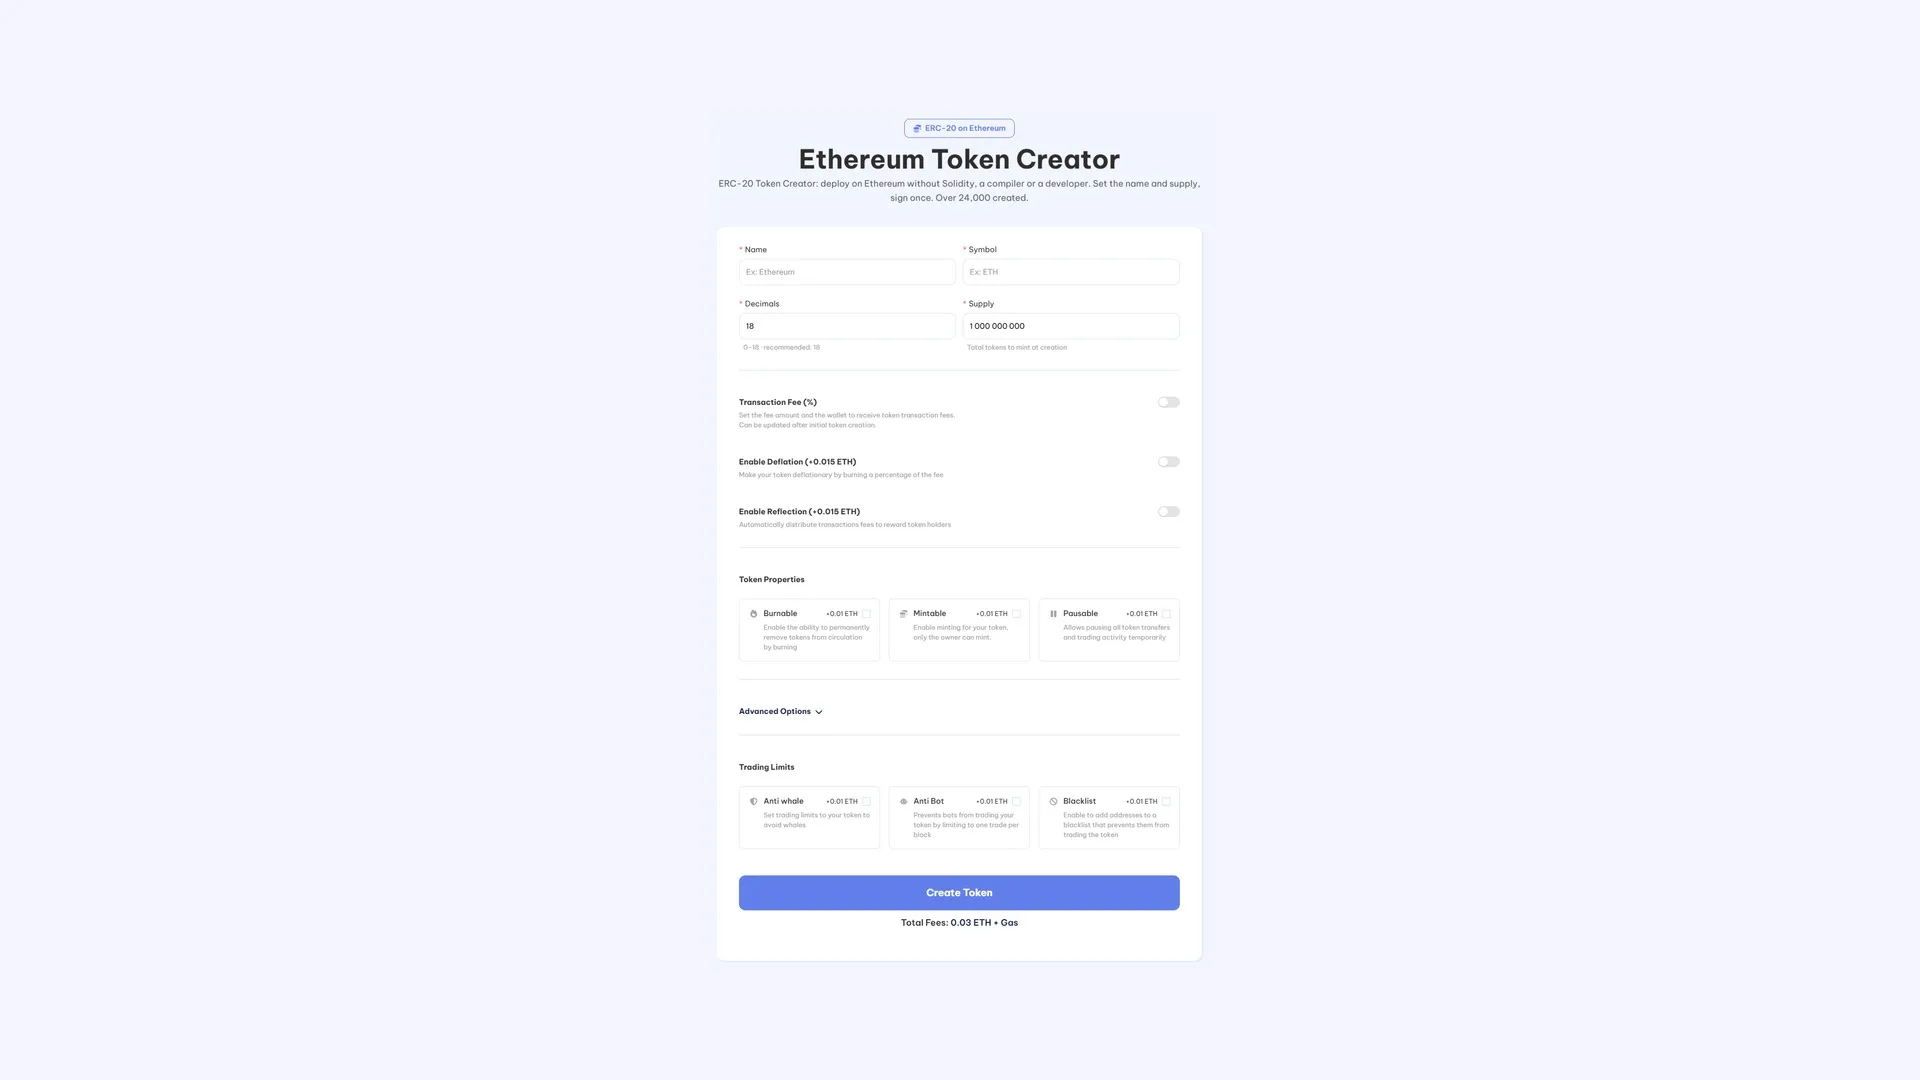
- Open the tool and connect your wallet. Make sure you’re on Ethereum mainnet before doing anything else.
- Enter the name and symbol. The name allows up to 32 characters and the ticker up to 8. Keep it short and check that nobody else is using it.
- Set decimals and supply. Decimals go from 0 to 18, and 18 is the ERC-20 standard. Supply is everything that gets minted at launch.
- Pick the features you want. Fees, burns, holder rewards, launch protections, distribution, and the pool. All explained in the next section.
- Review the total the widget shows you and click Create Token.
- Confirm in your wallet. A few seconds later you’ve got the token in your wallet and the contract is yours.
That’s the full flow to deploy a token on Ethereum. Once it’s live, you can find your token’s contract address to share it or paste it into any other tool.
There is no image or description field, and that is not an oversight: an ERC-20 contract does not store a logo on-chain. Your logo, banner and socials go out through the DEXTools option below.
Other features you can use when creating your ERC-20 token
They’re optional. A simple token doesn’t need any of them, but most of them can’t be added later, so it’s worth spending two minutes deciding now.
- Transaction Fee (free). Takes a percentage of every buy and sell and sends it to up to 10 wallets with the split you choose. Handy for funding marketing or treasury without selling your own supply, and the percentage can be changed after launch.
- Deflation (0.015 ETH). Burns a portion of every transaction, permanently. Handy when your pitch is a supply that shrinks as trading grows.
- Reflection (0.015 ETH). Sends a portion of the fees straight to holders, with a minimum balance required to receive them. Handy when you want to reward people for sitting tight instead of jumping in and out.
- Burnable (0.01 ETH). Lets you burn tokens manually whenever you want. Handy for announced burns: a milestone, a buyback, or clearing out whatever’s left after a airdrop.
- Mintable (0.01 ETH). Lets you mint more supply later, owner only. Handy for phased emissions or rewards programs. Leave it off if you’re pitching a hard cap, because holders will check.
- Pausable (0.01 ETH). Freezes all transfers and trading. It’s your emergency switch if something goes sideways in the pool and you need a minute to react.
- Anti-Whale (0.01 ETH). Caps how much a single wallet can buy, how often, and how much it can hold, for as many days as you set. Handy in the first days after launch, when the pool is still thin. More on this in our guide on bots and whales on Ethereum.
- Anti-Bot (0.01 ETH). Restricts your token to one trade per block, which breaks the way snipers operate. Useful right when you open liquidity, which is when snipers hit fresh pairs. For the full breakdown of how they work, check our deep dive into anti-bot mechanisms on Ethereum.
- Blacklist (0.01 ETH). Blocks specific addresses from trading. Useful when you’ve spotted a bot cluster or a wallet manipulating price.
- Multi-Wallet Distribution (0.01 ETH). Splits the supply across up to 10 wallets at creation. Handy to set up team, marketing and airdrop allocations in one shot, instead of burning gas on dozens of transfers.
- Socials and DEXTools banner (0.15 ETH). Pushes your website, Telegram, Discord, X, logo and banner to DEXTools straight from the tool. Worth it because a pair with full branding reads as a real project instead of an anonymous contract. If you’d rather do it by hand, our guide to adding a logo to your ERC-20 token walks through the long route.
- Create a liquidity pool (0.01 ETH). Opens the pool against ETH in the same flow and shows you the opening price before you sign. Useful when you want the token to be tradable the moment it exists.
On that last one: the ETH you pair is not spent, it is deposited. It sits in the pool and comes back out as people buy.
How much does it cost to create a token on Ethereum?
Deploying the contract costs 0.03 ETH plus Ethereum gas. Each feature above adds its own fee on top, so you only pay for what you actually turn on. The widget totals it on screen before you sign, so the number you see is the number you pay.
What to do after deploying your token on Ethereum
- Open liquidity if you skipped it in the flow. Until there’s a pool, your token is transferable but no one can buy it. Our guide on how to create a liquidity pool on Uniswap covers the setup, and how much liquidity to add is worth reading before you settle on a number.
- Get the word out with a airdrop instead of hundreds of manual transfers. See how to run a Ethereum airdrop.
- Keep the pair active once you have holders. Our plain-English guide to the Ethereum Volume Bot explains how it works.
- Keep an eye on your distribution. Here’s how to take a snapshot of your holders on Ethereum.
- Apply for listings. Both are free: how to list on CoinMarketCap and how to list on CoinGecko.
Launching a memecoin instead of a utility token? The playbook changes quite a bit, and we cover it in how to create and launch a Ethereum memecoin.
FAQ
How much does it cost to create an ERC-20 token on Ethereum?
0.03 ETH plus the gas for deployment. Optional features add a small fee each, starting at 0.01 ETH, and the tool shows you the total before you confirm.
Do I need to know how to code?
No. You fill in the tool, confirm a transaction, and it deploys an audited ERC-20 for you.
Can I change the transaction fee after creating the token?
Yes, the percentage can be changed once the token is live. The fee mechanism itself has to be enabled at creation, so switch it on (even at a low percentage) if you think you might want to use it down the line.
Can I upload a logo when creating the token?
Not from the token tool itself, because an ERC-20 doesn’t store images on-chain. Your logo, banner and social links go out through the DEXTools option in the same flow.
Who is the owner of the smart contract?
The wallet you connect. The contract is deployed under your wallet, so you keep control from day one. Smithii never asks for your private key or access to anything in your wallet.
Can my token be traded right after I create it?
Only if you opened a pool. A freshly created token is transferable, which is enough to run an airdrop, but no one can buy it until there’s liquidity behind it.
Conclusion
Launching a token on Ethereum comes down to one tool and one signature. Name, ticker, decimals and supply are the bare minimum, and the real call is which protections and mechanics you want baked into the contract before you ship it, because most of them can’t be bolted on later.
Start with a basic deploy if that’s all you need, and only add what your launch actually calls for.
Thanks for reading. Subscribe to our newsletter for weekly content built for web3 builders.
With your ERC-20 live on-chain, distribution, liquidity and visibility are what’s left. We break it all down, step by step and in order, in the ultimate guide for devs on Ethereum.

Crypto writer focused on the Web3 space. Former contributor to the Smithii editorial team.