
How to create a liquidity pool on Arc: open the USDC pair for your token on Uniswap V3 at the price you set
A token freshly deployed on Arc exists, but nobody can buy it until it has a market, and learning how to create a liquidity pool on Arc is the step that turns it into a priced asset. Once the pair is open, your token trades in USDC from the first minute, can be bought and sold on Uniswap, and starts showing up on screeners the moment someone trades it.
In this guide I’ll walk you through why Arc pools are set up a specific way, the process to get liquidity on this blockchain, how to calculate the starting price, and what the NFT you get in exchange for your liquidity actually is. Let’s get into it.
Why Arc pools run on Uniswap V3 at 1%
Arc has three versions of Uniswap running at the same time, but liquidity isn’t spread evenly. Tokens from Arc launchpads graduate to Uniswap V3 pools with the 1% fee, Argus tokens trade in Uniswap V4 pools with hooks, and Uniswap V2 barely holds any funds. A pool is only useful if it sits where traders and routers are already looking.
That’s why the tool always opens a Uniswap V3 pool at 1% paired with USDC. That fee tier also fixes the tick spacing at 200, and the position is created across the full price range, so it never falls out of range when the market moves: it works at any price, just like a classic pool.
If you’d rather launch from a launchpad instead of creating your own pool, you can launch your token on Argus or on Tolly.
How to create a liquidity pool on Arc step by step
The Liquidity Pool Creator by Smithii for Arc is a tool that lets you open the USDC pair of any Arc ERC-20 in a single transaction, with no need to set ranges or fee tiers in the Uniswap interface. You pick the amounts, the price comes out of their ratio, and the position is created across the full range. When you open the tool you’ll see the creation form:
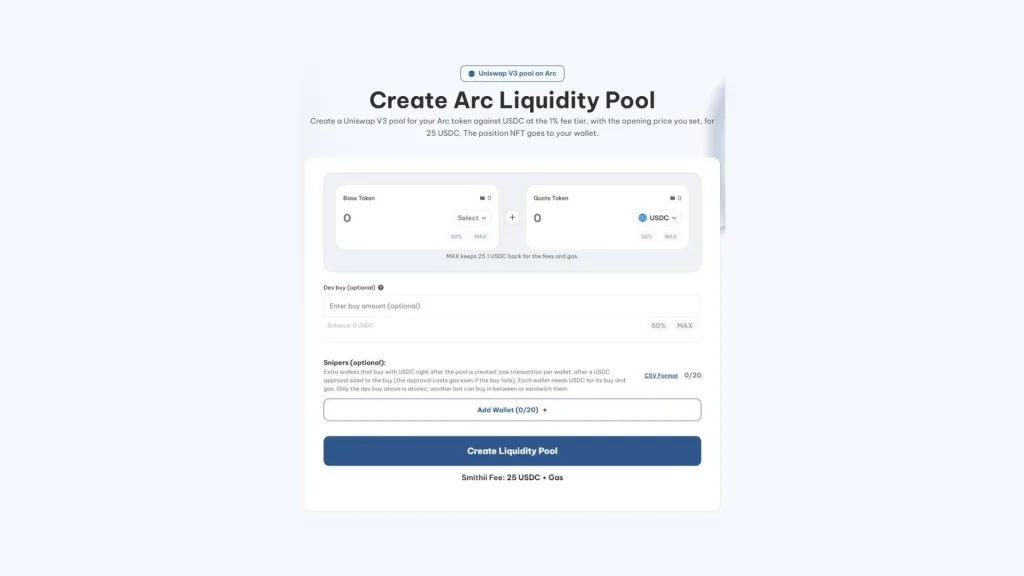
If you already have your token in your wallet and the USDC you’re going to contribute plus a bit extra for fees, follow these steps:
- Connect your EVM wallet to Arc: the one holding the token and the USDC you’re going to contribute.
- Pick your token as the Base Token: the other side of the pair is always USDC, so there’s nothing else to pick.
- Enter both amounts: how many tokens and how much USDC go into the pool.
- Check the starting price: the tool calculates it from the ratio between the two amounts.
- Hit Create Liquidity Pool and sign: the approvals, the 25 USDC fee, and the pool creation.
- Wait for confirmation: the pool is live and the position NFT lands in your wallet.
Before asking you to sign anything, the tool checks that no pool for your token at 1% already exists. If it finds one, it stops without charging anything, because adding to someone else’s pool would drop your liquidity in at a price somebody else set.
Optional dev buy and snipers when opening the pool
Below the amounts, the form has two options to buy the moment the pair exists. The dev buy is a purchase of your wallet that goes inside the same transaction that creates the pool, so it’s atomic: no one can buy before you do. This way you keep other wallets from front-running with an initial buy and grabbing the biggest chunk of supply at the lowest price possible.
The snipers feature lets you add up to 20 extra wallets that buy with USDC right after, each in its own transaction with a USDC approval sized to its buy. Since they aren’t atomic, another bot can slip in between them, so use them knowing their execution isn’t guaranteed.
If what you want is to spread the initial buy across many wallets, check out how to run a bundle on Arc.
USDC is the ‘native’ currency of the Arc network
On Arc, USDC is both the gas token and an ERC-20 with 6 decimals at the address 0x3600000000000000000000000000000000000000. The pool uses that side of token and gas comes out of the same balance, so there’s no need to wrap any token before creating the pair. The fee, the gas, and the quote side of the pool are all counted in the same currency. If you don’t have USDC on Arc yet, you can move it over from another network with a bridge.
How to calculate the starting price in USDC
The price isn’t set arbitrarily, it’s the result of dividing the USDC by the tokens you contribute. Since everything is priced in dollars, the math is straightforward, and it’s worth running the same calculation against the total supply to see the valuation the project launches at. With a supply of 1 billion tokens:
| Tokens in the pool | USDC in the pool | Starting price | Total valuation |
|---|---|---|---|
| 100.000.000 | 5.000 | 0.00005 USDC | 50,000 USDC |
| 200.000.000 | 5.000 | 0.000025 USDC | 25,000 USDC |
| 100.000.000 | 10.000 | 0.0001 USDC | 100,000 USDC |
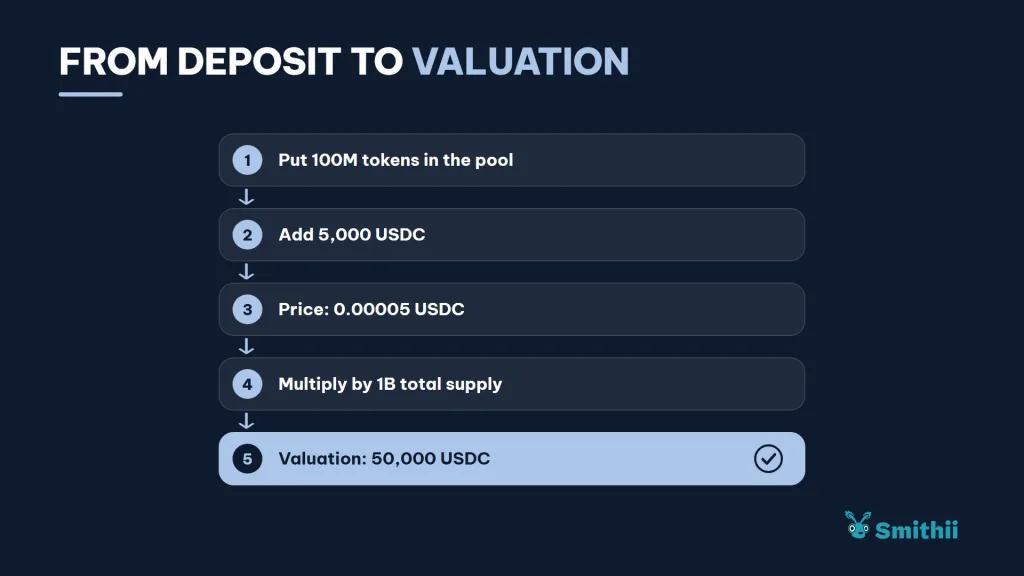
The first buyer pays exactly that price, so check the valuation before you sign. The other call is depth: with little USDC, any buy swings the price hard; with more, the chart behaves normally from the start.
If you don’t have the token yet, start by creating your token on Arc paying in USDC and come back after.
The position NFT that replaces LP tokens
On Uniswap V2, providing liquidity gives you LP tokens. On Uniswap V3 it doesn’t: your share is a NFT that gets minted to your wallet when you create the pool. That NFT holds your position, accrues the 1% fees paid by swaps, and is what you need to add to or withdraw from it later.
- Whoever holds the NFT controls the liquidity: transfer it and you transfer the whole position.
- Fees accrue inside the position: they’re collected on withdrawal, alongside your funds.
- The Smithii tools read it on their own: Arc’s Liquidity Adder and Liquidity Remover detect the positions in your wallet.
When you’re ready to top up the pair, here’s how to add liquidity to your Arc pool.
What to do after opening the pair on Arc
The pool exists and is tradable the moment the transaction confirms, but a pair with no activity won’t show up on any list. These are the usual next steps:
- Distribute part of the supply: an airdrop to your community creates the first holders and cuts the concentration scanners will flag.
- Audit the token the way a buyer will: Arc’s Rug Check walks you through the checks they’ll run before aping in.
- Generate the first trades: a volume bot runs against your Uniswap V3 pool and gets the screeners to pick it up.
None of these steps replace a community with real reasons to stay, but they do keep the token from slipping under the radar right when it can grab the most attention.
For that last part, check how to generate volume for a token on Arc with real swaps.
How much it costs to create a liquidity pool on Arc
The Smithii fee is 25 USDC and is paid once, when you create the pool. On top of that there’s network gas, also in USDC, and the tool checks before you sign that your balance covers the deposit, the fee, and gas all at once.
The USDC and tokens you deposit aren’t an expense. They stay yours inside the position and you can pull them out on withdrawal, with the usual swings any pool has as the price moves.
FAQ
On which DEX is the Arc pool created?
On Uniswap V3, at the 1% fee tier. That’s the tier Arc launchpad tokens graduate to, so your pair sits in the same market where the rest of the network already trades.
How much does it cost to create a liquidity pool on Arc?
The Smithii fee is 25 USDC, plus network gas, which on Arc is also paid in USDC. What you add as liquidity isn’t a cost: it stays yours inside the position.
Can I pair my token with something other than USDC?
Not with this tool. Every pool it creates is TOKEN/USDC, which is how Arc tokens are quoted and what the network’s routers understand.
What happens if a pool already exists for my token?
The tool checks before asking for any approval and stops if it finds a 1% pool for your token. Adding to a pool created by someone else would push your liquidity in at their price.
Do I get LP tokens?
No. On Uniswap V3 your share is a position NFT that lands in your wallet. Whoever holds that NFT controls the liquidity and collects the fees, so don’t transfer it without a reason.
Final thoughts
Once you know how to create a liquidity pool on Arc, you can give your token a market in the same place the rest of the network trades, with a dollar price you set and a position you keep as a NFT. The tool handles the fee tier, the range, and the check to make sure you don’t step on someone else’s pool.
Take a few minutes on the valuation before you sign. The opening price is the project’s first impression, and it’s the only part of the launch you can’t fix without pulling the liquidity.

Content creator and SEO contributor at Smithii. Systems Engineering student and crypto-tech enthusiast.