










How to create a token on Hyperliquid: the complete step-by-step guide
Figuring out how to create a token on Hyperliquid with the dApp from Smithii takes a couple of minutes and never asks you to touch a line of code. You fill everything in on screen, and along the way you can add features that give the launch far more depth than a bare-bones contract.
There’s one detail worth locking in before you start: unlike what happens on Solana, the identity info of the token is sealed the moment you deploy it. Neither the name nor the ticker can be tweaked afterwards.
Throughout this guide you’ll see the full procedure, what each optional function does, and how to combine them based on what you’re launching, whether that’s a utility token or a memecoin.
What your token gains on Hyperliquid and what you need before you start
Hyperliquid was built around a fully on-chain order book, and the smart contract layer, HyperEVM, arrived later to let you deploy applications on top of that same infrastructure.
Both halves share state, and that’s where the network’s edge comes from: a token deployed here doesn’t land in an empty ecosystem, but next to a community that trades daily and with real volume.
That shapes who your audience is. Around here it’s standard practice to open the explorer and check the contract before buying anything, so the bar for how you set up the token sits higher than on chains built around fast launches. On the technical side, though, nothing new to learn: HyperEVM is standard EVM and everything works exactly the way you’d expect.
What you need before creating a token on Hyperliquid
The requirements are minimal and you’ll have them sorted in minutes:
- An EVM wallet with HyperEVM configured. MetaMask, Rabby, or any wallet that supports WalletConnect.
- Enough HYPE balance to cover the deployment, gas, and whatever you plan to do next.
- Name, ticker, and total supply already decided. Everything else you can figure out inside the tool itself.
How to create a token on Hyperliquid step by step
You do it from the Token Creator by Smithii for Hyperliquid, a tool that handles the deployment in a single transaction without you writing a single line. When you open it you’ll see a screen like this:
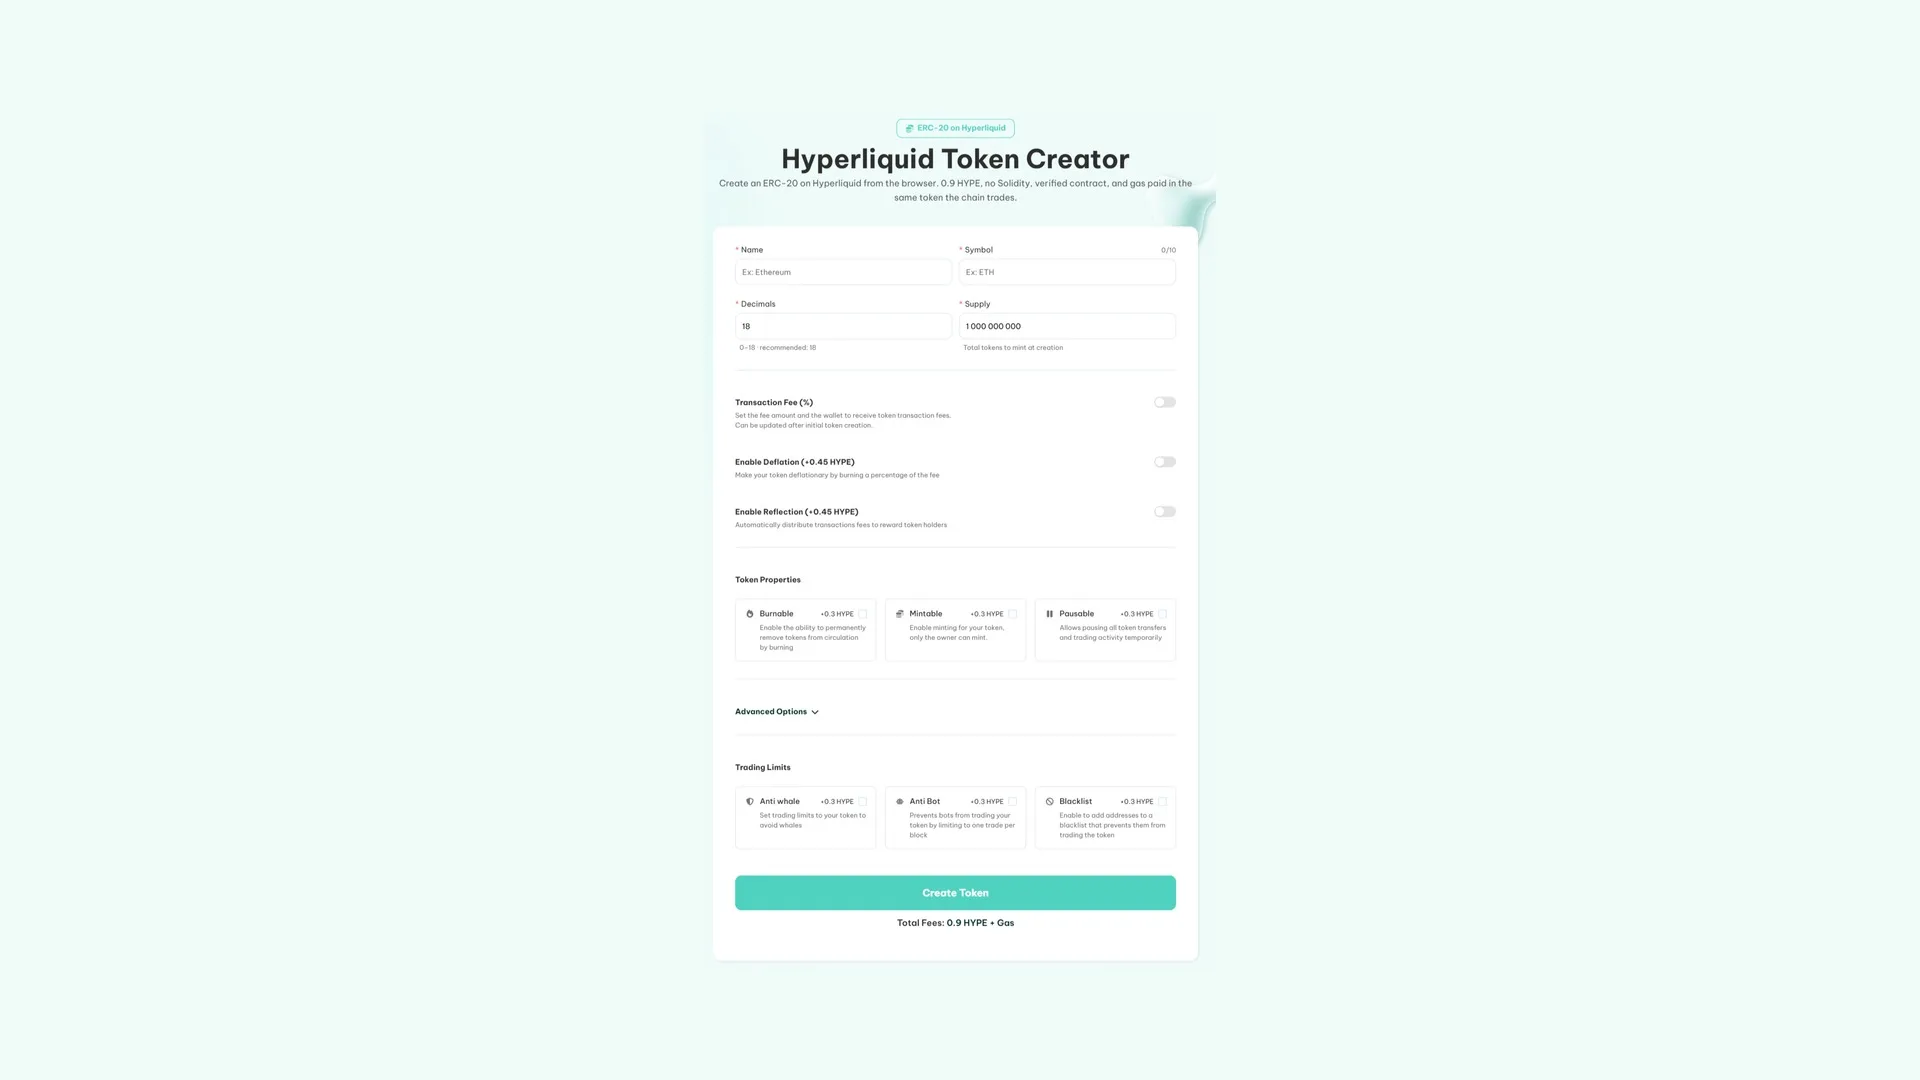
With the interface in front of you, the flow is this:
- Connect the wallet and check the network. Keep in mind that the signing address keeps control of the contract.
- Fill in name and symbol. It’s worth checking whether the ticker is already circulating on the network: sharing it with another project creates confusion you’ll drag around later.
- Set decimals and supply. Eighteen decimals is the EVM standard, and issuance happens only once, with the full amount landing in your wallet.
- Tick the functions you want to include. You can keep a clean token or stack layers on top; in the next section we break down what each one does.
- Review the amount and hit ‘Create Token’.
Once you sign the transaction from your wallet, the token will show up right there. And if you also want the supply to be distributed across multiple addresses from the start, that’s set up in the advanced options, which we’ll cover as well. And if you’d rather skip the theory and jump straight to creating it:
How much it costs to create the token
The deployment is 0.9 HYPE plus network gas plus whatever the functions you enable add on top. Each extra is billed separately, so a token with no add-ons stays at the base figure. The tool calculates your total before you confirm anything.
Additional functions you might want
The dApp doesn’t stop at the basics: it comes with a set of optional layers that get added to the deployment if you want them. All of them can also be enabled with the token already live, from the Token Manager.
Basic options
Transaction Fee (Free)
Applies a fee on every buy and every sell, and splits it across the addresses you designate, up to a max of ten and with whatever ratio you decide. Useful for covering project expenses without dipping into your own token bag. The percentage can be changed later on.
Deflation (+0.45 HYPE)
Pulls a slice of every trade out of circulation by burning it, no action required from you. Fits when the project’s thesis is that supply shrinks through actual usage of the token.
Reflection (+0.45 HYPE)
Redistributes part of the fee revenue to holders of the token, requiring a minimum balance to qualify. Fits when you want to reward long-term holders over quick flippers.
token Properties
Burnable (+0.3 HYPE)
Lets you manually destroy tokens whenever you decide. Fits burns you announce in advance: milestone hits, buybacks, or clearing leftovers from a distribution.
Mintable (+0.3 HYPE)
Leaves the door open to issue additional tokens after the contract is deployed, restricted to the owner wallet. Fits emission schedules or ongoing incentives. If your pitch is a fixed supply, you don’t need it.
Pausable (+0.3 HYPE)
Freezes all transfers and activity for as long as you keep it on. It’s your emergency brake for a security issue or weird behavior in the pair.
Advanced Options
Multi-Wallet Distribution (+0.3 HYPE)
Splits the supply across up to ten addresses during deployment itself, with whatever weights you set for each. Fits when you want team, marketing, incentive, and liquidity buckets pre-allocated without chaining transfers afterward.
DEXTools Socials + Banner (+4.5 HYPE)
Sends DEXTools your website, Telegram, Discord, and X links, along with the logo and banner, without leaving the form. Fits when you want the token to show up with its own identity instead of as an unlabeled address.
Create a Liquidity Pool (+0.3 HYPE)
It spins up the pair inside the same flow, pitting your token against HYPE, and shows you the starting price before you confirm. It’s set up so the token is tradable from the moment it’s born. And heads up: the HYPE you put in doesn’t vanish, it stays locked inside the pair.
Trading Limits
Anti whale (+0.3 HYPE)
Caps how much a single address can buy and hold: max per trade, mandatory cooldown between trades, total accumulated, and how many days the rule stays in force. Fits the early phase, when the pair has the least depth.
Anti Bot (+0.3 HYPE)
Restricts token to one trade per block, which is the condition that shuts down sniping bots. Fits right when you enable liquidity, so the launch isn’t hijacked by a machine.
Blacklist (+0.3 HYPE)
Blocks the addresses you flag from trading. Fits when you’ve already identified bots or wallets that are gaming the price.
Why you can’t edit the meta info of a token on Hyperliquid
HyperEVM follows the ERC-20 standard, and that standard simply doesn’t include any function to rewrite the name or symbol once the contract is deployed. It’s not a limitation of the tool, it’s how the token itself is defined.
What you can adjust is the visual identity displayed on platforms like DEXTools, which is handled outside the contract and always optionally.
On every other layer (burns, automatic rewards, per-address caps, blocklists, initial distribution), the rule is simple: turn them on only if you have a concrete use case in mind. A contract with everything switched on doesn’t project ambition, it projects indecision. And if what you’re after is shrinking supply, first look at how a buyback and burn is structured, because the strategy alone may be enough without the built-in function.
What comes next after minting a token on Hyperliquid
A deployed contract on its own isn’t something anyone can actually buy. These are the moves that turn it into a real project:
- Give it a price and make it tradable by opening a market: how to create a liquidity pool on Hyperliquid.
- Distribute the supply, pay out rewards, or run an airdrop: the Hyperliquid multisender.
- Keep transactions flowing while the community forms and to back organic volume on the screeners: the Hyperliquid volume bot.
- Lock down permissions once there’s nothing left to tweak: renounce ownership on Hyperliquid.
Before you announce it, check whether your Hyperliquid token is sellable using the same simulation your buyers will run.
If you’re pairing against the network’s native coin, remember that a pair needs two tokens and native HYPE isn’t one. You have to wrap it first, which we cover in what WHYPE is and how to wrap your HYPE.
Once the pair has some traction, the next front is distribution, which we break down in how to promote a meme coin. And listing requests on CoinMarketCap and CoinGecko cost nothing and hold up far better when there’s already a live market behind them.
If at any point you need to pull up your contract address, you’ll find it in our guide to finding the contract address of a token.
FAQ
Do I need to code anything?
Not at all. The dApp deploys an already audited contract based on what you fill in on screen, with zero compiling or touching Solidity.
Does my regular wallet work?
Yes, as long as it’s EVM and has HyperEVM configured. MetaMask and Rabby work with no special tweaks, because what gets deployed is a standard ERC-20.
What does the deployment cost?
0.9 HYPE plus network gas. Any optional feature you enable is billed separately, and the total shows up calculated before you approve the transaction.
Can I fix the name or symbol later?
No. That data gets locked into the contract at deployment and the ERC-20 standard doesn’t allow editing it, so double-check it before signing.
Which wallet should I use to sign?
One you plan to keep, because it gets written in as the contract owner and will be the only one able to call any admin functions you’ve enabled.
Conclusion
Deploying a token on Hyperliquid comes down to a single signature; the project starts right after. What you settle on that screen are the permissions the contract will live with and who gets to use them.
Only switch on what you’ll actually use, take your time reviewing the name and the ticker because there’s no second chance there, and save your energy for the parts you can still adjust on the fly. If you want to understand what separates the projects that last from the ones that don’t, we break it down here.
The contract is live on HyperEVM. For everything that comes next, from the HyperSwap pool to listings, check the definitive guide for devs on Hyperliquid, laid out phase by phase.

Content creator and SEO contributor at Smithii. Systems Engineering student and crypto-tech enthusiast.